|
| Beginners' Interactive Style Demo / Tool |
Introduction
Many thanks to Dean Watson for his hard work creating the code
and for allowing me to modify and use it in this demo.
|
|
|
|
|
This tool lets users see how
various properties act and interact. As you change properties the menu will
update showing the results, and you can save the design you create. It does not contain all
the available style properties or menu properties.
If you know nothing about the Milonic Menu or are looking for information on downloading,
installation, php, asp, mysql please use the following links.
- Beginners' Manual I recommend this as the starting point for those who do not know the menu.
-
php/mysql asp/sqlserver sample and downloads
- Milonic DHTML Menu Support Forum
Beginners should look over the information and screenshots below
to become familiar with the menu_data.js file before using the tool.
Tool / Demo
|
Though to a beginner creating a menu may seem confusing, using the
Milonic DHTML Menu to design your own menus is simplicity itself.
You don't need to know javascript, be a webpage guru, or a programmer. The
programming has been done for you, and to design the menu you want all you
really need to know is how to type!
|
Understanding the menu_data.js file
|
Menu design is done in the menu_data.js file. There are four sections
within the file, but only the top 3 are editable by the user.
|
|

|
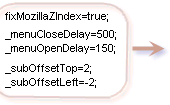 |
Global properties:These properties are applied to the whole menu. All Global Properties
menuCloseDelay and menuOpenDelay set the time of delay before a submenu opens or closes when
the mouse is moved on or off a parent item.
subOffsetLeft and subOffsetTop allow fine tuning of the submenu position in relation to its parent.
|
 |
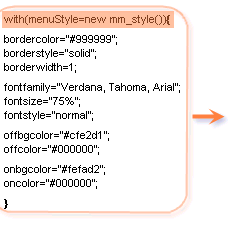
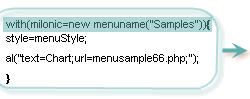
Style Section: this section of the menu data file is one of the areas to create your menu styles.
Here you would specify your colors, fonts, borders, etc. As the image shows, you don't need to know
any css or js. All you have to do is type in the property next to its name. So, to choose fonts,
you just need to place your choice next to fontfamily=. Note on some items there are off and on properties.
These are used to set the property dependant on whether the mouse is over the item or not. All Style Properties
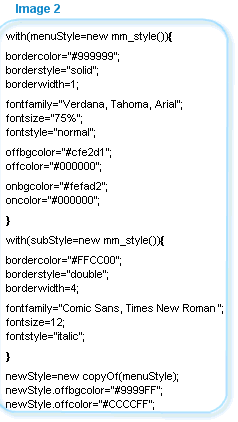
It is possible to create numerous styles and apply them to different menus. You may name the
styles whatever you want to name it, e.g. mainStyle, subStyle, style1 etc.
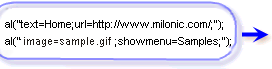
There are two ways to create more styles. See Image 2
- If the styles are totally
different, the easiest way to create them is to copy and paste menuStyle, rename it to the name
of your choice and then change the properties to whatever colors, borders etc. you want. You
may add more properties or eliminate any you don't wish to use in this style
- If you are only
changing a few things, you can use the copyOf method as shown in Image 2. In this case, only the offbgcolor and offcolor are different from menuStyle. The menu will use menuStyle, and include the two changes created here. You can name it whatever you want, you do not have to use newStyle
|
 |
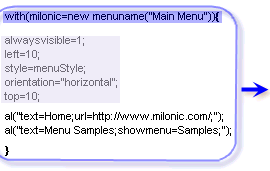
Main Menu:all menus in the Milonic Menu system can be a main menu or a sub menu. This makes it easier to create menus since you would create all of them the same, and only change the menu properties to make it a main or a sub menu. All Menu Properties.
The top section of the menu is where you put the name you wish to assign, code which style it will use, how it will function, e.g. be an alwaysvisible menu, be a submenu that opens on mouseover, onclick, be horizontal or vertical. If it is a main menu the position on the page is set here.
Note the difference between the Main Menu and the Samples submenu below it. The only property declared in the submenu is the style telling the program what colors, fonts etc. to use for this menu.
The positioning of the submenu is automatic, however you have the ability to use menu properties to fine tune its placement. For example, you can move it right or left using the left="offset=x"; or shift it up and down using top="offset=x"; where x is the number of pixels you want to shift it. These properties would be placed just below the style=; and before the first aI string.
Below the menu properties are the aI strings. These are your menu items where the item text, url if the item is a link, a showmenu if it opens a submenu are placed.
|

|
aI String: This is where you place your item information, the text that will
show in the menu, the url, if the item is a link, showmenu if it calls a submenu. It can be text
as shown in the first aI, or it can be made of an image. In addition to your information, you
can also add style properties here. In this way you can have a style for the menu, and can
change some style proeprties making them different for one item so it stands out. For example,
you could put offbgcolor=#ff0000; and this item would have a red background in the off state.
Note the difference when you put this property in the aI string. Unlike in the styles section,
there are no quote marks. All Item Properties
|
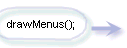 |
drawMenus(); is a command to the menu program. It is not editable and must be present in any menu_data file. In effect it says "above is all the information on style, content, layout etc. use this and put the menu on the page"
|
|
|
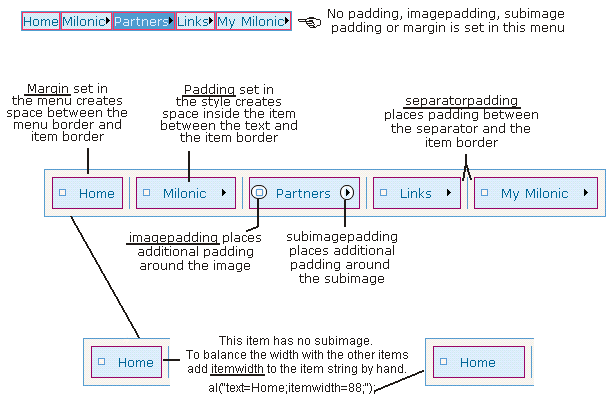
Padding and Margin Properties Screenshot
The following screenshot shows what happens to the menu when padding and
margin properties are applied. The first menu [first image] is the base from which
the other menu was created just by adding the padding and margin properties to the code.
|
|
|
Continue to Tool / Demo
|
|